| |
|
| |
 |
 |
 |

|
|
| |
 |
Stop Motion Video
Blurring the lines between photo & video
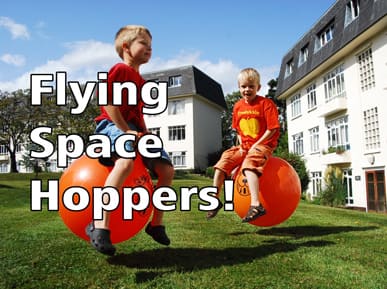
Making stop-motion animation projects is lots of fun and easier than you thought. All you need is your digital camera, some imagination, and Corel PaintShop Photo Pro and VideoStudio Pro X3. In this tutorial, well use pro photographer Paul Treacys Flying Space Hoppers video as an example of how to turn an afternoon of fun into a magical stop-motion adventure.

|
|
Shooting
Get your shutter finger ready! Shooting stills for stop motion means taking a lot of pictures. You can simply set your camera on Continuous Shooting mode and keep your finger on the shutter while you follow the action. Or, you can shoot an activity like bouncing a ball, or tossing it, and by removing some frames selectively, make the ball appear to float. Take a look at the
sample video shot by pro photographer Paul Treacy, and see Pauls tips on shooting stills for stop-motion:
|
 |
 |
Organise images
View and select your images.
-
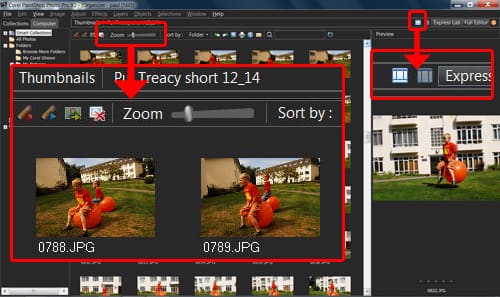
Open PaintShop Photo Pro in Organizer mode.
-
Open the folder with your photos in it. Click on the thumbnail mode icon, and drag the slider to resize so you can see enough of the content to make a judgment.
-
Delete the photos that are not suitable, depending on the kind of motion photography you are trying to capture. Also be ruthless about deleting shots which are otherwise unusable because of soft focus or other technical issues. If a photo or a group of photos is a little too dark, however, they can be rescued in PaintShop Photo.
 |
Enhance images
Apply fixes and effects to groups of images.
If you find a group of photos that are a little underexposed, you can fix one and apply the fix to all.
-
Select the first photo that needs to be fixed, click on the Express Lab tab.
-
In Express Lab, click the Smart Photo Fix button, click on the Suggest Setting button top right.
-
If necessary tweak the Brightness and other setting using the sliders.
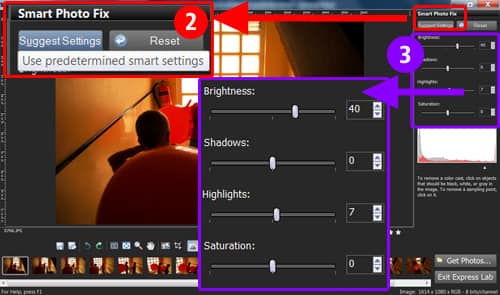
Click on Exit Express Lab to go back to the organizer. Save the image when prompted.
-
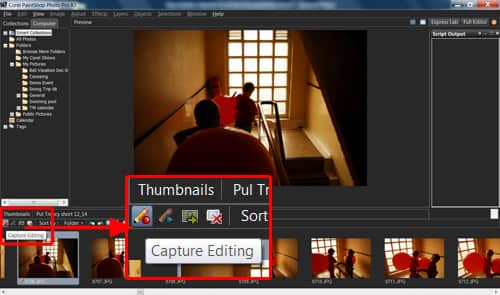
Now in the Organizer, select the edited photo (note the pencil icon that shows its been edited). Click the Capture Editing button, or alternatively right-click and select Capture Editing.
-
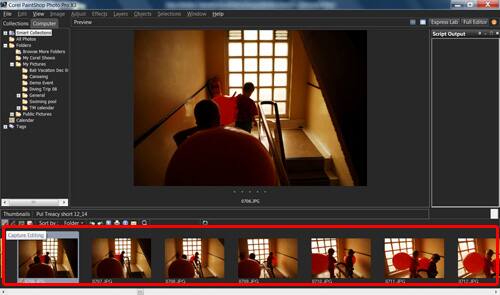
Shift-Select the group of photos that need their exposure fixed.
-
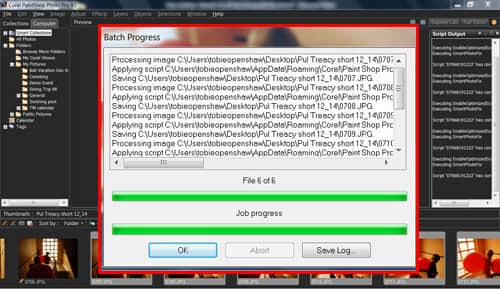
Select Apply Editing, and watch as PaintShop Photo applies your edits to all the photos. When done, click OK!
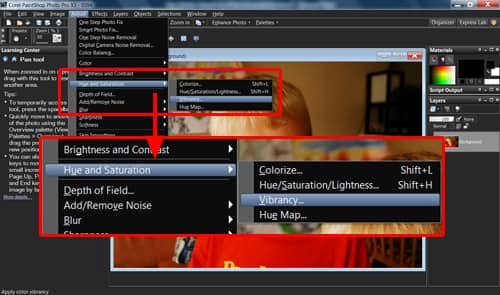
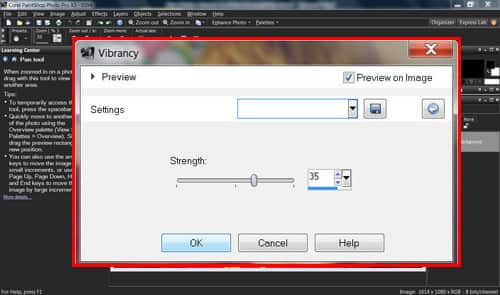
PaintShop Photo has a new Vibrancy effect that brings out the saturation in underexposed areas, for a dramatic improvement in appearance. You can apply it to your entire set of photos.
-
Simply select the first photo in the set, then click on the Full Photo Editor tab.
-
In the main toolbar, click on Adjust, Hue and Saturation and select Vibrancy.
-
Select a suitable value, and click OK.
-
Now go back to the Organizer, and repeat steps 4 to 7 above, applying the effect to ALL your photos. You may have to wait a while for this action to complete. Save your work and close PaintShop Photo Pro - the initial preparation work is done!
 |
|
 |
| |
Prepare your project
Get all your photos in order.
Before you start, it's worthwhile to make sure all your project preferences are set correctly:
-
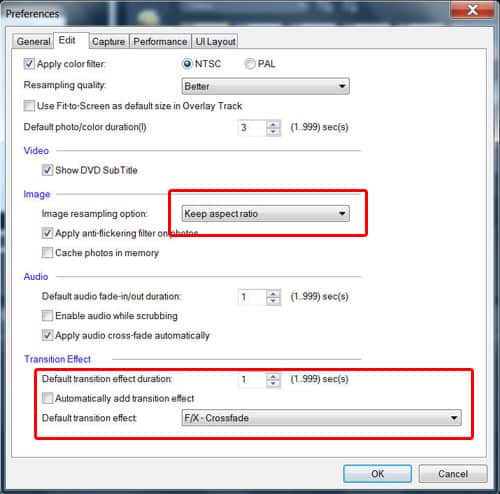
Go to Settings/Preferences and under the Edit tab, in Transition Effect, make sure the default setting of Automatically add transition effect is still deselected.
-
Set Default transition effect to FX/Crossfade. This will come in handy later.
-
Also note that under Image you can select Keep aspect ratio, which with most cameras will cause small black bars to appear on either side of your photo, or Fit to project size, which will stretch the photo to fit the widescreen format.
Now let's create a new library to keep the images that we'll use in this project organized.
-
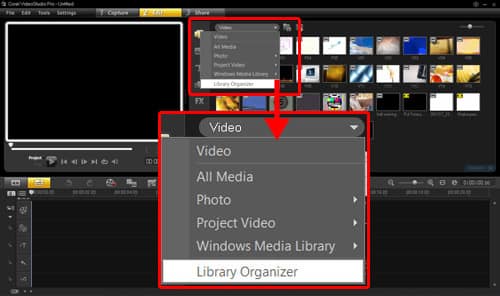
In the Library at the top, click on the drop-down list next to Video and select Library Organizer.
-
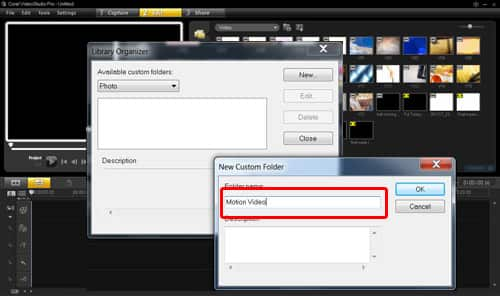
Click the drop-down list to Photo, select New, and create a library with a suitable name for your project. Click Close.
-
Now, under Photo, select Photo - filename. At the top, click on the Add icon and find the Windows folder with your photos. Select all the photos and click Open.
-
Click on the Sort clips in Library button and sort photos by name in descending order.
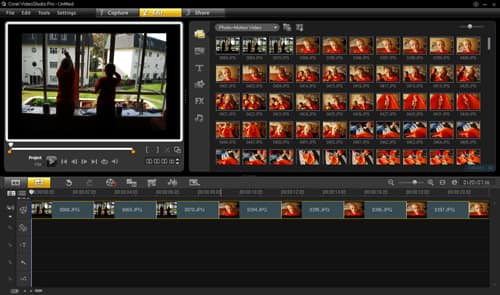
 |
Construct your project
Assemble your photos on the timeline.
-
Select all the photos, and drag them onto the timeline.
-
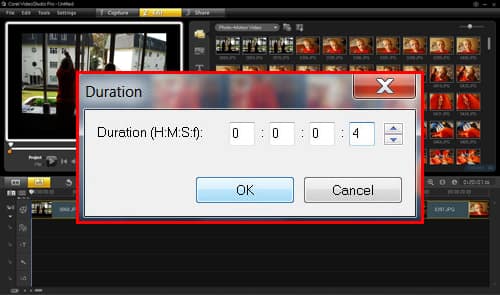
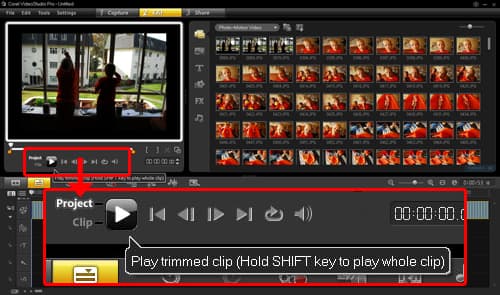
While all the photos are still selected, right-click and select Change Photo Duration. Set the duration per photo as 4 frames. This means each photo will span 4 frames; so since PAL frame rate is 25 frames per second, this gives an approximate rate of 6 frames per second for your stop-motion animation. (If you need to re-select all the frames on the timeline, use the slider below the timeline to go to the beginning, and click on the first frame. Then use the slider to go to the last frame, and while holding down SHIFT, click on the last frame.)
-
Hit play, and watch as your still images come to life for the first time!
-
Now you can spend some time selecting sequences and shuffling them around until you are satisfied that your movie follows a storyline with a beginning, middle and end.
 |
Edit your project
Its time to get creative and personalize your project.
First, let's create a simple opening for our film - a classic fade-in from black.
-
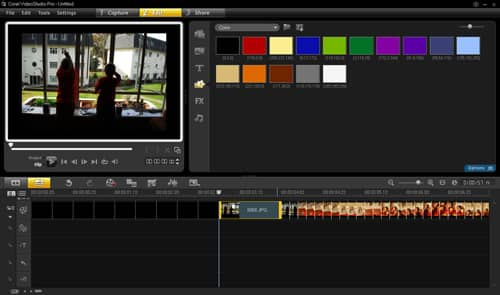
Select a black color clip and place it in the beginning before your photos. Keep the default duration of 3 seconds. Select the first photo and drag its duration to about 1 second.
-
Now, drag it to the left, overlapping the black clip to automatically create a Crossfade transition - and youre done!
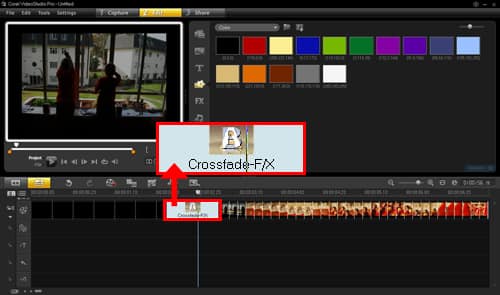
-
Now let's apply a creative filter to our opening image. Under FX, find the Autosketch filter and drag it on to the first photo.
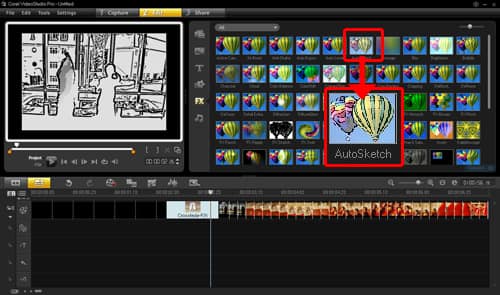
-
Double-click in the photo to bring up the Options, and Click on Customize Filter.
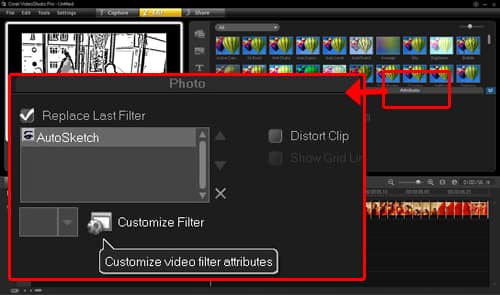
-
Click on the Color box and change the line color to something that fits in more with your production. Click OK.
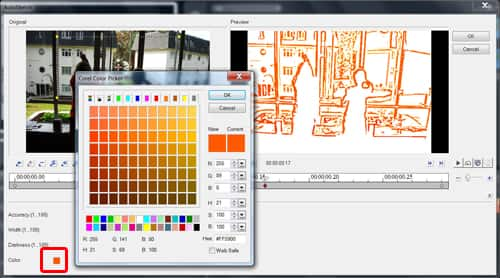
-
Next we're going to add an opening title. Select Title in the vertical toolbar, and choose a suitable Preset Title. Drag this down into the Title track, double-click on the preview window to select the text, and type a title for your video. You can now click on the title and reposition it anywhere on the screen.
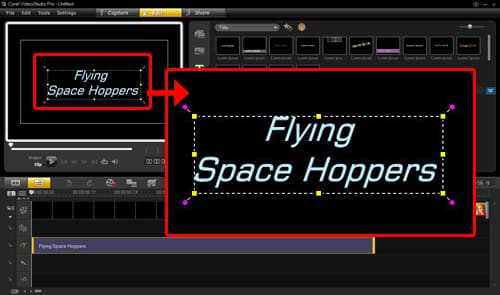
-
Double-click and select the text on the preview screen, and in the Edit panel, select a more pleasing font. You can also click on the color box and select a different color for your title.
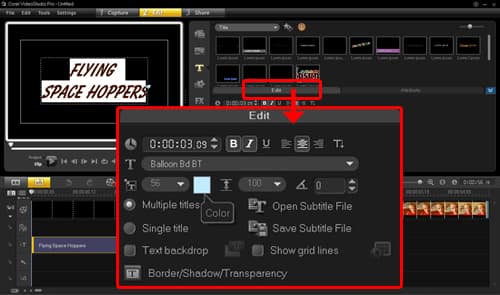
-
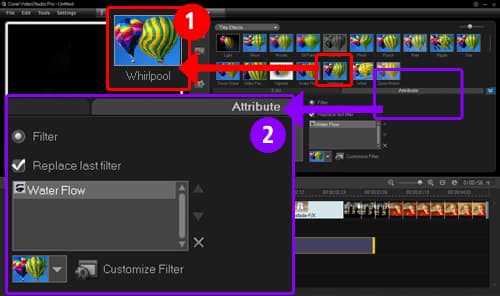
Next, you can apply a motion filter to a title. Select FX in the vertical toolbar and drag a suitable filter on to the title on the timeline. Double-clicking the title on the timeline opens options panel and here you can select the Attribute tab.
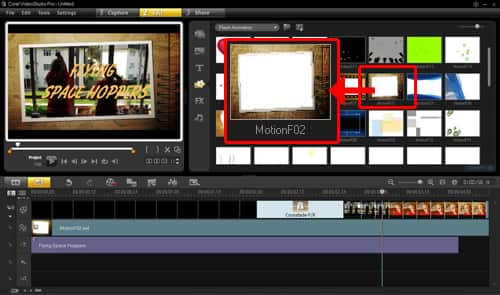
- Now let's add an animated frame to our opening. In the Graphic library, click on Color and in the drop-down box, select Flash Animation.
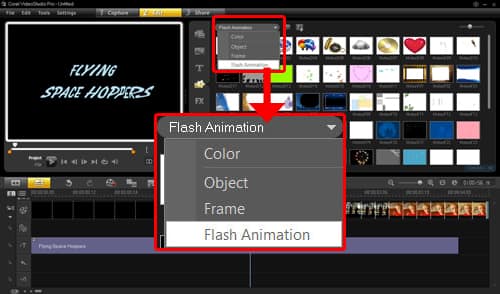
- Select a frame and drag it on to Overlay Track 1.
-
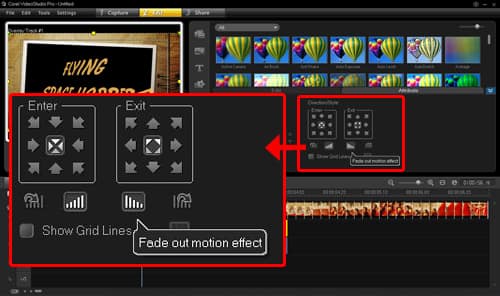
In the timeline, drag the frame ends to adjust its length, so that it matches the title sequence as shown. Then click on Options, and select Fade in and Fade out. Play your title sequence and adjust where necessary.
Add filter to multiple frames
Let's add another title to introduce a new section of our movie.
-
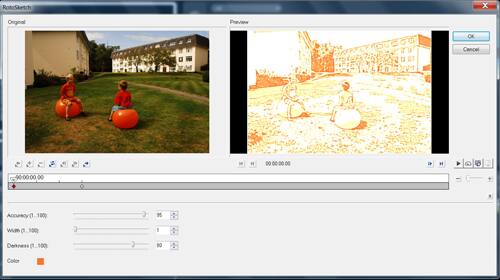
Pick a sequence of photos that serve as the background for the title. About 2 seconds should do. In the FX library, select the Rotosketch filter and apply to the first photo of your background section.
-
Double-clicking that photo brings up the Attribute tab, then click on Customize Filter. Here you can change the line color to the same as your opening sequence.
Now you want to apply the same effect to all the photos in the sequence. Fortunately, this is very easy to do in VideoStudio Pro.
-
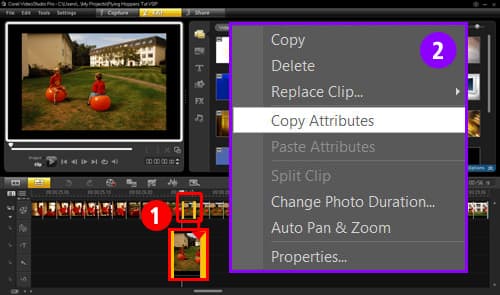
Right-click on the first frame that you have already modified, then select Copy attributes.
Next, select the first unmodified frame after the one you just modified. Hold down SHIFT and select the LAST frame in the sequence.
-
Now right-click and select Paste attributes. All the frames will now have the same effect!
-
Now you can follow steps 4 to 10 again to insert a suitable title.
-
Play your movie and make any final tweaks to the order of sequences.
 |
Add music
Create a custom soundtrack for your movie.
-
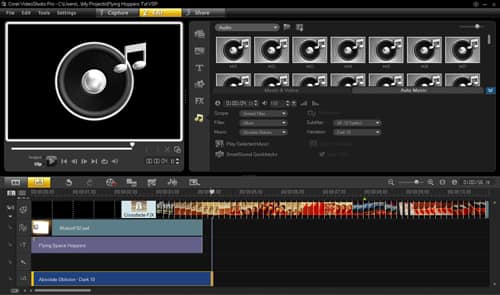
When you are happy with the sequence and pacing of your video, it's time to add suitable royalty-free music. SmartSound let's you customize a soundtrack that's just right for your production. Let's do 2 parts: one for the intro, and one for the body and the ending.
-
With the cursor placed at the beginning of the project, click on the Audio icon, then under Options select Auto Music. As an example, select Absolute Oblivion, and click Insert to timeline.
-
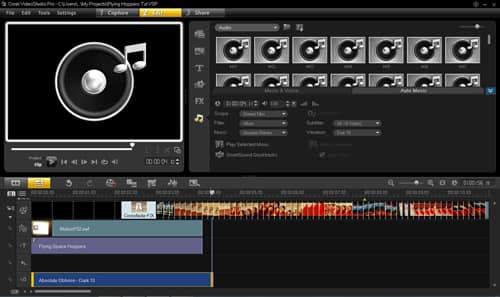
Adjust the length by dragging the end of the track to just after the opening sequence. Note that Smartsound intelligently plays a musical ending, irrespective of the duration you select.
-
Place the cursor after this track, select Wild Chase, and Insert.
-
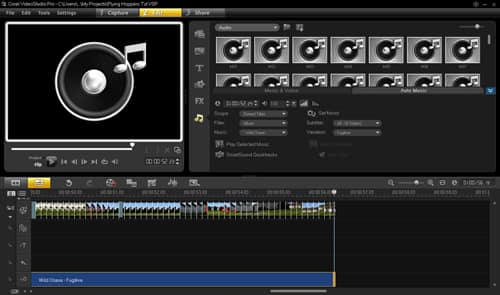
Now you can simply drag the music a little bit longer in both directions and overlap the tracks for an automatic crossfade effect. Play the result and tweak it until the changeover from the one to the other is smooth.
-
Drag the end of the track to match up with the end of the movie.
-
Hit Control-S to Save, and there you go, your project is ready for sharing!
 |
Share your project on Vimeo
Show your work to the world
-
In the Share step, select Upload to Vimeo.
-
Select a format. MPEG-4 HD will give you the best quality that Vimeo supports, and if you used full-resolution photos, this should give stunning results.
-
Log in or create a Vimeo account if you haven't already done so. Simply follow the onscreen instructions.
-
Your video will render and then automatically upload to Vimeo. Once its finished, check to make sure it plays back ok, and youre done!
|
 |
| |
| • |
Before starting your project, make sure your camera batteries are fully charged and that you have several memory cards available.
|
| • |
Since these images are for a movie rather than for printing you could shoot small jpegs. I prefer to shoot RAW files. My camera is fast and has a large buffer so should any of the individual stills be outstanding I have the option to print it large.
|
| • |
When shooting, I concentrated on making my exposures just as the space hopper was at the highest point above the ground. You could simply keep shooting in rapid bursts and edit later to filter out the unusable images, but this is hugely inefficient. My camera has a very short black out time and so it was relatively easy to anticipate the moment the hopper was at its highest point. A little practice will help.

|
| • |
As it was a bright day I simply set the exposure at 500th of a second at F8, ISO 200 and used a wide lens so focusing was easy as there was substantial depth of field.
|
| • |
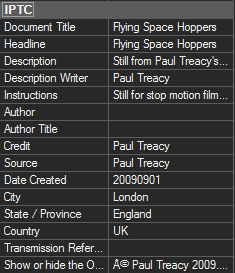
Once your images are in your computer, I strongly recommend entering some meta data into your images such as your name, © and some keywords. This will afford you some protection against image theft and make your files easy to retrieve from your archive later on.
|
| • |
The next important task is to cull the unusable images. Those where your subject's eyes are closed or where the composition is simple not good enough or the exposure is not right etc. This could be a large number of images but you'll likely still have plenty of images to work with. Only choose the best shots. If an image in your finished piece is not up to standard, it will interrupt the flow of your film and distract your audience. So if in doubt, take it out.
|
| • |
When your files are ready, it's time to start sequencing. This is the fun bit. Some sequences will work and some will not. Don't be afraid to delete clusters of images during this process. Remember that only a small proportion of what you shot will actually be usable.
|
| • |
I found that each sequence of images I had could be moved around the overall film. The ordering of images does not have to match the order in which they were shot. You can have some fun with this and moved sets of images around. You could also run a sequence in reverse. You can do what you like. You could even run a sequence of upside down images. The possibilities are endless.
|
| • |
When all your files are in the order you want, then you will need to put them on a timeline to control the duration of each image's display during the film. I set each image duration of .2 of a second (5 frames) with the last image in the sequence set to .4 of a second (10 frames). The slight increase in time for the last image provides an easy transition into the next sequence. I do not recommend using crossfade, or similar transitiond for every image. It simply would not work. However, using a crossfade can work very well when changing subject matter. But the duration of the images on either side of the transition will need to be about a second with the cross dissolve transition set for half a second. You could slow the transition to a second.
|
Whatever works best for you.
Enjoy. Paul Treacy
|
| |
|
 |
 |
 |
 |
 |
 |
 |
 |
 |
 |
|
| |
 |
 |
 |
 |
 |
 |
 |
 |
 |
 |
 |
 |
 |
 |
 |
 |
 |
 |
 |
 |
 |
 |
 |
 |
 |
 |
 |
Light painting
Artist Neil Wade uses simple tools to explore exciting new areas of digital photography. |
Advancing your craft
Check out tips, tricks and tutorials for stop-motion video, portrait makeovers and more |
Take the next step
Digital media is evolving and is beckoning us to stretch into the future. |
VideoStudio Pro X3
 |
Full
Upgrade |
$189.00
$149.00 |
 |
PaintShop Photo Pro X3
 |
Full
Upgrade |
$149.00
$119.00 |

|
Find a store near you |
 |
 |
 |
 |
 |
 |
 |
 |
 |
 |
 |
 |
 |
 |
 |
 |
 |
 |
 |
 |
 |
 |
 |
 |
 |
 |
 |
 |
|


